需求背景
近日公司需要一个从顶部弹出的遮罩弹窗组件,找了一圈flutter组件库中组件,没有发现符合条件的能现成拿出来使用的,看了一圈之后发现,bottomSheet组件基本能满足我的弹窗需求,但是为什么flutter不提供一个Sheet组件能自定义控制弹出位置呢,于是脑子里突发有了一个聪明的想法,既然没有,那咱们就手动干。不给topSheet是吧,那我就把bottomSheet给你封装成topSheet!(不知道后来的小伙伴如果接手我的代码使用到topSheet组件时,会是什么想法)开干!!
需求分析
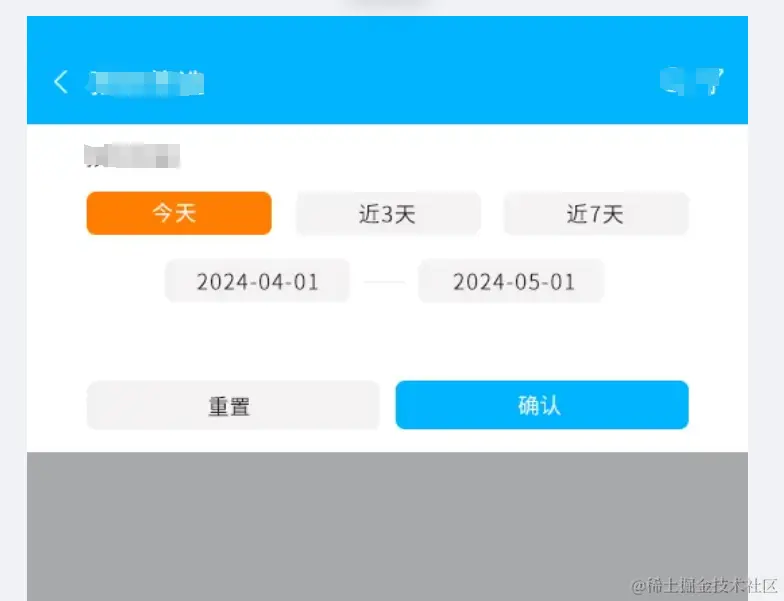
先看看ui给的设计图文章源自灵鲨社区-https://www.0s52.com/bcjc/flutterjc/16418.html
 文章源自灵鲨社区-https://www.0s52.com/bcjc/flutterjc/16418.html
1、弹出框要在appbar的下方。文章源自灵鲨社区-https://www.0s52.com/bcjc/flutterjc/16418.html
2、弹出时遮罩层需要展示出来。文章源自灵鲨社区-https://www.0s52.com/bcjc/flutterjc/16418.html
3、内容是不固定的,但是标题、确认、重置按钮可以抽象出来作为公共部分。文章源自灵鲨社区-https://www.0s52.com/bcjc/flutterjc/16418.html
4、点击遮罩层需要自动退出topSheet。文章源自灵鲨社区-https://www.0s52.com/bcjc/flutterjc/16418.html
开干
首先创建一个topSheet.dart文件,写上组件代码文章源自灵鲨社区-https://www.0s52.com/bcjc/flutterjc/16418.html
php
import 'dart:async';
import 'package:cashier/common/theme/app_theme.dart';
import 'package:cashier/widgets/ui/buttons/ui_filled_btn.dart';
import 'package:flutter/material.dart';
import 'package:flutter_gen/gen_l10n/cashier_localizations.dart';
// 定义一个抽象类来表示子部件的共同特征
abstract class TopSheetChildState<T extends StatefulWidget> extends State<T> {
void reset();
confirm();
}
class TopSheet {
static double? _screenHeight;
static double? _appBarHeight;
static double? _calculateHeight;
static void _calculateHeights(BuildContext context) {
// 获取整个屏幕的高度
_screenHeight = MediaQuery.of(context).size.height;
// 获取appBar的高度
_appBarHeight = AppBar().preferredSize.height;
// 得出组件应该有的高度
_calculateHeight = _screenHeight! - _appBarHeight!;
}
/// [context] 上下文
/// [child] 子组件(State要满足TopSheetChildState抽象类)
/// [childKey] 调用子组件方法需要使用
/// [showConfirm] 展示确认按钮
/// [showReset] 展示重置按钮
static Future<T?> show<T>(
BuildContext context,
GlobalKey<TopSheetChildState<StatefulWidget>> childKey,
StatefulWidget child,
{bool showConfirm = true,
bool showReset = true}) async {
if (_statusBarHeight == null ||
_screenHeight == null ||
_appBarHeight == null) {
_calculateHeights(context);
}
return await showModalBottomSheet(
context: context,
backgroundColor: Colors.transparent,
barrierColor: Colors.transparent,
isScrollControlled: true,
shape: const Border(),
enableDrag: false,
useSafeArea: true,
builder: (BuildContext context) {
CashierLocalizations cashierLocalizations =
CashierLocalizations.of(context);
return Container(
height: _calculateHeights,
color: Colors.black.withOpacity(0.5),
child: Column(
children: [
Container(
constraints: const BoxConstraints(
minHeight: 200,
),
padding: EdgeInsets.symmetric(
horizontal: 44,
vertical: Theme.of(context).mediumSpace
),
color: Colors.white,
child: Column(
children: [
child,
const SizedBox(height: 58),
Row(
mainAxisAlignment: showConfirm && showReset
? MainAxisAlignment.spaceBetween
: MainAxisAlignment.center,
children: [
Visibility(
visible: showReset,
child: UiFilledBtn.mdGreyLarge( // UiFilledBtn是我根据ui自定义的button组件,大家可以自行切换成自己项目内使用的button
context,
btnText: cashierLocalizations.reset,
onPressed: () => childKey.currentState?.reset(), // 调用子组件reset方法
)
),
Visibility(
visible: showConfirm,
child: UiFilledBtn.mdBlueLarge(context,
btnText: cashierLocalizations.confirm,
onPressed: () {
T res = childKey.currentState?.confirm(); // 调用子组件confirm方法返回表单数据
Navigator.pop(context, res);
}
)
)
],
)
],
),
),
// 点击遮罩层退出topSheet
Expanded(
child: GestureDetector(
onTap: () => Navigator.of(context).pop(),
)
)
],
),
);
},
);
}
}
这里说下实现思路,将appBar以下部分全都设置为bottomSheet组件的可视区域,然后将bottomSheet组件内容用一个Container填充,将Container的背景色设置为Colors.black.withOpacity(0.5)展现成普通弹窗遮罩层的样子,将child子组件传递给bottomSheet展示表单内容,通过子组件reset方法和子组件confirm方法进行交互(这里定义了子组件必须是抽象类TopSheetChildState的派生类)。文章源自灵鲨社区-https://www.0s52.com/bcjc/flutterjc/16418.html
使用方法
先实现一个TopSheetChildState的派生类文章源自灵鲨社区-https://www.0s52.com/bcjc/flutterjc/16418.html
ini
import 'package:cashier/common/theme/app_theme.dart';
import 'package:cashier/common/utils/date_manager.dart';
import 'package:cashier/widgets/dialogs/dialog.dart';
import 'package:cashier/widgets/dialogs/top_sheet.dart';
import 'package:cashier/widgets/ui/buttons/ui_filled_btn.dart';
import 'package:flutter/material.dart';
import 'package:flutter_gen/gen_l10n/cashier_localizations.dart';
class ReservationSheetForm extends StatefulWidget {
final GlobalKey<ReservationSheetFormState> formKey;
final ReservationSheetFormModel? formData;
final List<int> days;
final List<String> daysLabel;
final String subTitle;
const ReservationSheetForm(
{this.formData,
required this.formKey,
required this.days,
required this.daysLabel,
required this.subTitle})
: super(key: formKey);
@override
State<ReservationSheetForm> createState() => ReservationSheetFormState();
}
class ReservationSheetFormState
extends TopSheetChildState<ReservationSheetForm> {
DateTime? startDate;
DateTime? endDate;
int? btnSelectDay;
late ReservationSheetFormModel _formData;
late CashierLocalizations cashierLocalizations;
@override
void initState() {
initData();
super.initState();
}
void initData() {
_formData = ReservationSheetFormModel(
startDate: widget.formData?.startDate,
endDate: widget.formData?.endDate);
if (_formData.startDate != null) {
startDate = DateManager.parseDate(_formData.startDate!);
}
if (_formData.endDate != null) {
endDate = DateManager.parseDate(_formData.endDate!);
}
if (startDate != null && endDate != null) {
btnSelectDay = DateManager.calculateDaysDifference(startDate!, endDate!);
}
}
Future<void> selectDate(BuildContext context,
{String type = 'startDate'}) async {
final DateTime? pickedDate = await showDatePicker(
context: context,
initialDate: type == 'startDate' ? startDate : endDate,
firstDate: DateManager.getTenYearsAgo(),
lastDate: DateManager.getCurrentDate(),
initialEntryMode: DatePickerEntryMode.calendarOnly,
initialDatePickerMode: DatePickerMode.day);
if (pickedDate != null && type == 'startDate' && pickedDate != startDate) {
if (endDate != null && pickedDate.isAfter(endDate!)) {
Toast.show(type: ToastType.error, msg: cashierLocalizations.message_date_error);
return;
}
setState(() {
startDate = pickedDate;
_formData.startDate = DateManager.formatDate(startDate!);
btnSelectDay = null;
});
return;
}
if (pickedDate != null && type == 'endDate' && pickedDate != endDate) {
if (startDate != null && pickedDate.isBefore(startDate!)) {
Toast.show(type: ToastType.error, msg: cashierLocalizations.message_date_error_reverse);
return;
}
setState(() {
endDate = pickedDate;
_formData.endDate = DateManager.formatDate(endDate!);
btnSelectDay = null;
});
}
}
@override
Widget build(BuildContext context) {
cashierLocalizations = CashierLocalizations.of(context);
return Column(
crossAxisAlignment: CrossAxisAlignment.start,
children: [
Text(
widget.subTitle,
style: Theme.of(context).blackMd,
),
SizedBox(height: Theme.of(context).mediumSpace),
Row(
mainAxisAlignment: MainAxisAlignment.spaceBetween,
children: _buildSquareBtns()),
SizedBox(height: Theme.of(context).mediumSpace),
Row(
mainAxisAlignment: MainAxisAlignment.center,
children: [
UiFilledBtn.smGreyLarge(
context,
btnText: _formData.startDate ?? cashierLocalizations.start_time,
onPressed: () => selectDate(context),
),
Container(
width: 15,
height: 2,
color: Theme.of(context).whiteGrey,
margin: EdgeInsets.symmetric(
horizontal: Theme.of(context).smallSpace
),
),
UiFilledBtn.smGreyLarge(
context,
btnText: _formData.endDate ?? cashierLocalizations.end_time,
onPressed: () => selectDate(context, type: 'endDate'),
),
],
),
],
);
}
List<UiFilledBtn> _buildSquareBtns() {
List<int> days = widget.days;
List<String> daysLabel = widget.daysLabel;
List<UiFilledBtn> btns = [];
for (int i = 0; i < days.length; i++) {
bool selected = btnSelectDay == days[i];
UiFilledBtn btn = selected
? UiFilledBtn.smOrangeLarge(context,
btnText: daysLabel[i], onPressed: () => fliterDateSearch(days[i]))
: UiFilledBtn.smGreyLarge(context,
btnText: daysLabel[i],
onPressed: () => fliterDateSearch(days[i]));
btns.add(btn);
}
return btns;
}
// 按时间检索
void fliterDateSearch(int day) {
if (day == btnSelectDay) return;
setState(() {
btnSelectDay = day;
startDate = day == 30
? DateManager.getOneMonthAgo()
: DateManager.getPastDate(day);
_formData.startDate = DateManager.formatDate(startDate!);
endDate = DateManager.getCurrentDate();
_formData.endDate = DateManager.formatDate(endDate!);
});
}
@override
confirm() => _formData;
@override
void reset() => setState(() {
btnSelectDay = null;
startDate = null;
endDate = null;
_formData.startDate = null;
_formData.endDate = null;
});
}
class ReservationSheetFormModel {
String? startDate;
String? endDate;
ReservationSheetFormModel({required this.startDate, required this.endDate});
}
然后在正常组件中使用这个topSheet文章源自灵鲨社区-https://www.0s52.com/bcjc/flutterjc/16418.html
less
GlobalKey<ReservationSheetFormState> ck = GlobalKey<ReservationSheetFormState>();
  ReservationSheetFormModel? res = await TopSheet.show<ReservationSheetFormModel>(
      context,
      ck,
      ReservationSheetForm(
          subTitle: cashierLocalizations.mine_sale_order_time,
          days: const [0, 15, 30],
          daysLabel: [cashierLocalizations.today, cashierLocalizations.fifteen, cashierLocalizations.one_month],
          formKey: ck,
          formData: ReservationSheetFormModel(
              startDate: orderReq.startDate, endDate: orderReq.endDate)
          )
  );
总结一下
swift
/// 主要就是要在派生类中传入这两个参数
/// [formKey] 子组件的key 保证TopSheet可以调用子组件的confirm和reset方法
/// [formData] 初始的表单数据结构 在confirm方法调用之后返回给上一级
/// 其它的都是自定义的内容了 你表单如何 就如何写你的ui渲染以及逻辑交互
final GlobalKey<ReservationSheetFormState> formKey;
final ReservationSheetFormModel? formData;
/// 最终在ReservationSheetFormState记得实现confirm方法和reset方法就可以
后续优化思路
后期有想把例如时间区间选择这种做成一个插件嵌入到topSheet表单中使用,包括一些其它的经常使用到的功能都抽象成TopSheet插件的形式供使用者引入,定制化的表单再特殊写。
总结
至此,需求落幕,一个有点叛逆的菜鸡前端工程师写flutter应用。有更好的实现思路欢迎大家评论留言,最后祝大家都0warning、0error。


评论