
之前章节介绍了nestjs框架下如何上传图片,返回了资源地址,但实际开发中资源上传成功,不单单只返回个url地址,还需要返回文件名称,文件类型,文件大小等,这时候我们需要通过个资源映射来满足需求,在这篇博客中,我们将探讨资源映射的优缺点,并以NestJS为例,展示如何实现这一策略。文章源自灵鲨社区-https://www.0s52.com/bcjc/mysqljc/17419.html
资源映射的优缺点
任务方案都会有优缺点,本方案也不例外文章源自灵鲨社区-https://www.0s52.com/bcjc/mysqljc/17419.html
- 优点
- 灵活性:通过资源映射表,可以轻松地管理和查询资源。
- 安全性:资源url路径不带有文件名称,路径更安全。
- 可维护性:资源路径的变化只需更新映射表,而不需要修改实际文件或数据库记录。
- 缺点
- 复杂性:获取用户上传的资源时候,不能在记录删直接获取,需要从关联的资源表中查询资源名称和地址
读者可以根据自身业务选择方案,本文使用NestJS实现资源映射,以下将以用户上传头像和附件为例,展示如何使用NestJS实现资源映射策略。文章源自灵鲨社区-https://www.0s52.com/bcjc/mysqljc/17419.html
预先了解知识
本次文章使用到的知识:nestjs,upload,mysql,docker,读者需对之前的文章有所了解:文章源自灵鲨社区-https://www.0s52.com/bcjc/mysqljc/17419.html
- 《nestjs链接mysql操作数据》
- 《nestjs入门实战(二):上传图片》
整体时序图
其中上传头像是没有使用资源映射,而上传附件资源是走了资源映射文章源自灵鲨社区-https://www.0s52.com/bcjc/mysqljc/17419.html
实现步骤
1.创建项目和环境依赖
本文通过nestjs中上传User头像(不使用映射存储)和User 附件(使用映射存储)为例子,数据中的存储使用到Mysql文章源自灵鲨社区-https://www.0s52.com/bcjc/mysqljc/17419.html
1.1 创建项目
使用 Nestjs CLI 快速创建项目:nest-upload-resource-mapping (点击了解如何CLI创建项目)文章源自灵鲨社区-https://www.0s52.com/bcjc/mysqljc/17419.html
shell文章源自灵鲨社区-https://www.0s52.com/bcjc/mysqljc/17419.html
nest new nest-upload-resource-mapping
启动项目文章源自灵鲨社区-https://www.0s52.com/bcjc/mysqljc/17419.html
shell文章源自灵鲨社区-https://www.0s52.com/bcjc/mysqljc/17419.html
cd nest-upload-resource-mapping
npm run start:dev
1.2 Mysql 环境搭建
为了方便快速使用Mysql,这里使用Docker进行搭建,切换到项目中创建容器配置文件:docker-compose.yml (点击了解Docker具体步骤配置Mysql)
shell
touch docker-compose.yml
docker-compose.yml 具体内容
yml
version: '3.1'

services:
  db:
    image: mysql:8.0
    command: --default-authentication-plugin=mysql_native_password
    restart: always
    environment:
      MYSQL_ROOT_PASSWORD: example
      MYSQL_DATABASE: testdb
    ports:
      - 3307:3306

  # navicat
  adminer:
    image: adminer
    restart: always
    ports:
      - 8080:8080
这里定义了两个镜像:
- mysql的镜像,username默认为root,password为 example,database是:testdb
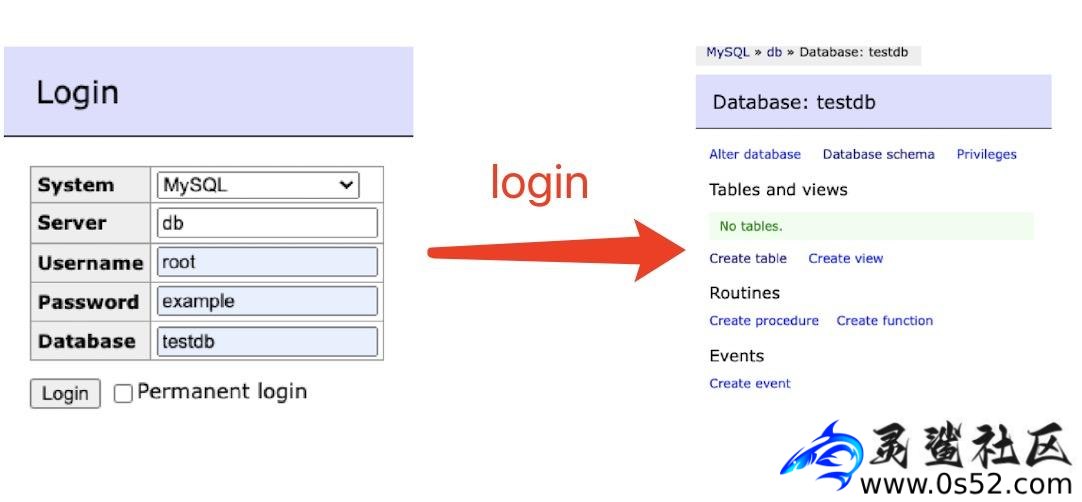
- adminer管理数据库简单而强大的工具,方便可视化查看数据,通过localhost:8080访问页面
1.3 Docker 启动
启动Docker镜像
shell
docker-compose up -d
访问:localhost:8080 查看Adminer 中 database:testdb 情况
2.nestjs支持资源上传
nestjs 应用可以通过Multer框架,对资源进行上传
2.1 配置Multer
资源上传使用Multer,需要安装相关依赖
shell
npm i multer @types/multer --save
nestjs CLI快速创建 upload资源上传模块
shell
  nest g mo upload
  nest g co upload --no-spec
upload.module.ts 添加处理上传资源代码:
ts
// src/upload/upload.module.ts

import { Module } from '@nestjs/common';
import { MulterModule } from '@nestjs/platform-express';
import { diskStorage } from 'multer';
import { extname, join } from 'path';
import { UploadController } from './upload.controller';

const uploadDir = join(process.cwd(), 'uploads');

@Module({
  imports: [
    MulterModule.register({
      storage: diskStorage({
        destination: (req, file, cb) => {
          cb(null, uploadDir);
        },
        filename: (req, file, cb) => {
          const ext = extname(file.originalname);
          const filename = `${Date.now()}${ext}`;
          cb(null, filename);
        },
      }),
    }),
  ],
  controllers: [UploadController],
  providers: [],
})
export class UploadModule {}
这里会把上传后的文件存放在项目根目录下的 uploads中,需要再main.ts 启动项目时候检查是否有该文件,如果没有需要创建
ts
// src/main.ts

import { NestFactory } from '@nestjs/core';
import * as express from 'express';
import * as path from 'path';
import { existsSync, mkdirSync } from 'fs';
import { AppModule } from './app.module';

async function bootstrap() {
  const app = await NestFactory.create(AppModule);
  const uploadDir = path.join(process.cwd(), 'uploads');
  if (!existsSync(uploadDir)) {
    mkdirSync(uploadDir);
  }

  app.use('/uploads', express.static(path.join(process.cwd(), 'uploads')));

  await app.listen(3000);
}
bootstrap();
同时使用express.static把 uploads目录内的文件映射出来,可以通过url进行访问
2.2 上传头像图片资源
在 upload.controller.ts创建上传图片接口: localhost:3000/upload/uploadImage 请求方式为Post, Post body中参数为file
ts
// src/upload/upload.controller.ts

import {
  Controller,
  Post,
  UploadedFile,
  UseInterceptors,
} from '@nestjs/common';
import { FileInterceptor } from '@nestjs/platform-express';

@Controller('upload')
export class UploadController {
  @Post('/uploadImage')
  @UseInterceptors(FileInterceptor('file'))
  async uploadImage(@UploadedFile() file) {
    const fileUrl = `http://localhost:3000/uploads/${file.filename}`;
    return {
      url: fileUrl,
    };
  }
}
通过Postman上传图片查看效果

3. User更新头像
现在开始引入用户更新头像的业务场景,通常情况下用户头像更新的业务逻辑时序器
3.1 链接mysql
这里使用TypeORM框架(ORM 对象关系映射)来建立应用程序与数据库之间的连接,安装TypeORM依赖:
shell
npm install --save @nestjs/typeorm typeorm mysql2
在项目src/app.module.ts(root module)中通过@nestjs/typeorm来链接mysql
ts
// src/app.module.ts

import { Module } from '@nestjs/common';
import { TypeOrmModule } from '@nestjs/typeorm';
import { AppController } from './app.controller';
import { AppService } from './app.service';
import { UploadModule } from './upload/upload.module';
import { UserModule } from './user/user.module';

@Module({
  imports: [
    TypeOrmModule.forRoot({
      type: 'mysql',
      host: 'localhost',
      port: 3307,
      username: 'root',
      password: 'example',
      database: 'testdb',
      entities: [__dirname + '/**/*.entity{.ts,.js}'],
      synchronize: true,
    }),
    UserModule,
    UploadModule,
  ],
  controllers: [AppController],
  providers: [AppService],
})
export class AppModule {}
3.2 创建用户
链接数据成功后创建User模块和相关controller,service, 同时创建user实体类user.entity.ts
shell
nest g mo user
nest g co user --no-spec
nest g s user --no-spec
touch  src/user/user.entity.ts
其中 user.entity.ts代码:
ts
// src/user/user.entity.ts

import { Entity, Column, PrimaryGeneratedColumn } from 'typeorm';

@Entity()
export class User {
  @PrimaryGeneratedColumn()
  id: number;

  @Column()
  name: string;

  @Column()
  avatar: string;
}
user.service.ts 中添加创建user 方法
ts
// src/user/user.service.ts

import { Injectable } from '@nestjs/common';
import { InjectRepository } from '@nestjs/typeorm';
import { Repository } from 'typeorm';
import { User } from './user.entity';

@Injectable()
export class UserService {
  constructor(
    @InjectRepository(User)
    private usersRepository: Repository<User>,
  ) {}

  create(user: User): Promise<User> {
    return this.usersRepository.save(user);
  }
}
UserController 中添加对应create user记录的api接口
ts
// src/user/user.controller.ts

import { Controller, Post, Body } from '@nestjs/common';
import { UserService } from './user.service';
import { User } from './user.entity';

@Controller('users')
export class UserController {
  constructor(private readonly userService: UserService) {}

  @Post()
  create(@Body() user: User): Promise<User> {
    return this.userService.create(user);
  }
}
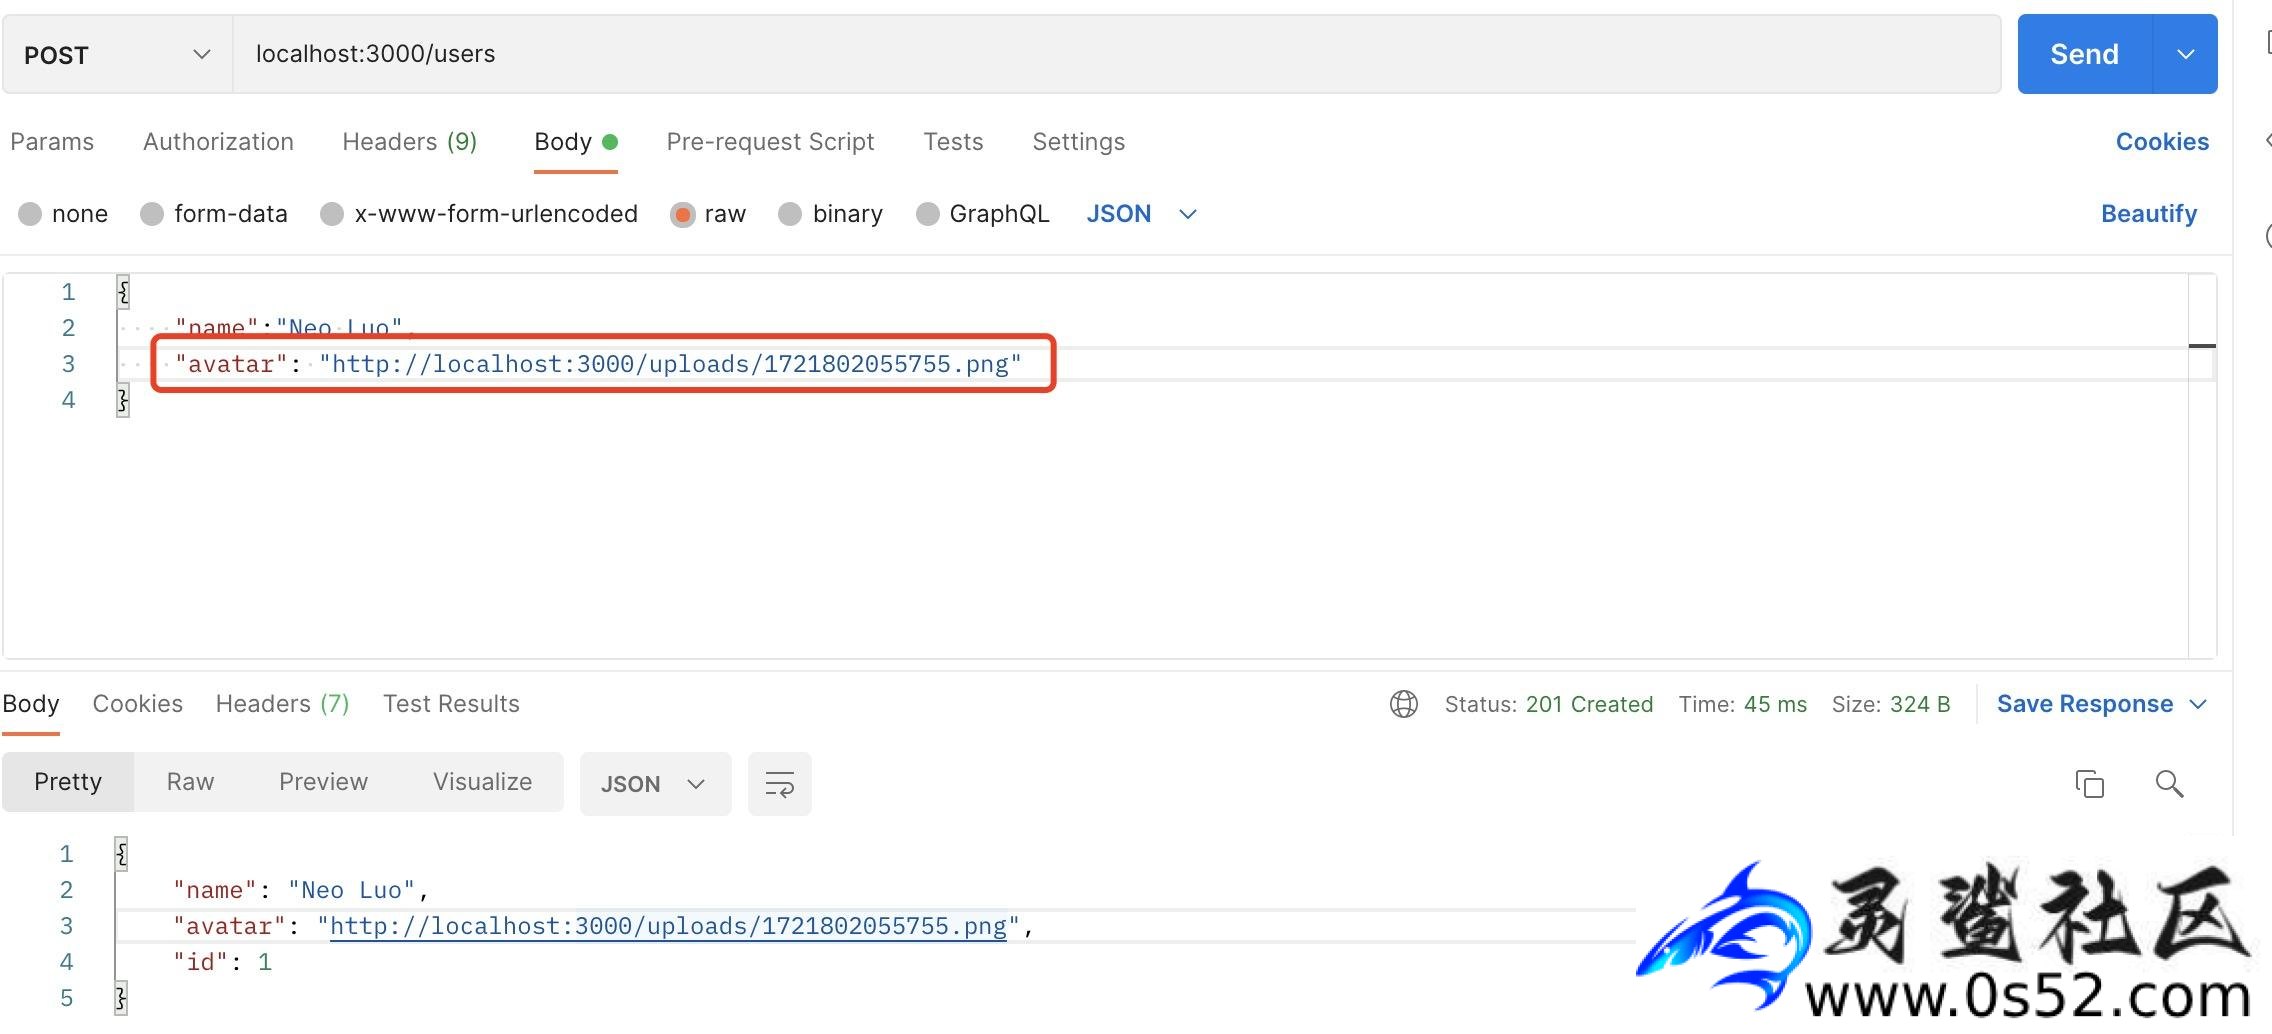
Postman中创建User,其中头像使用步骤2生成的头像
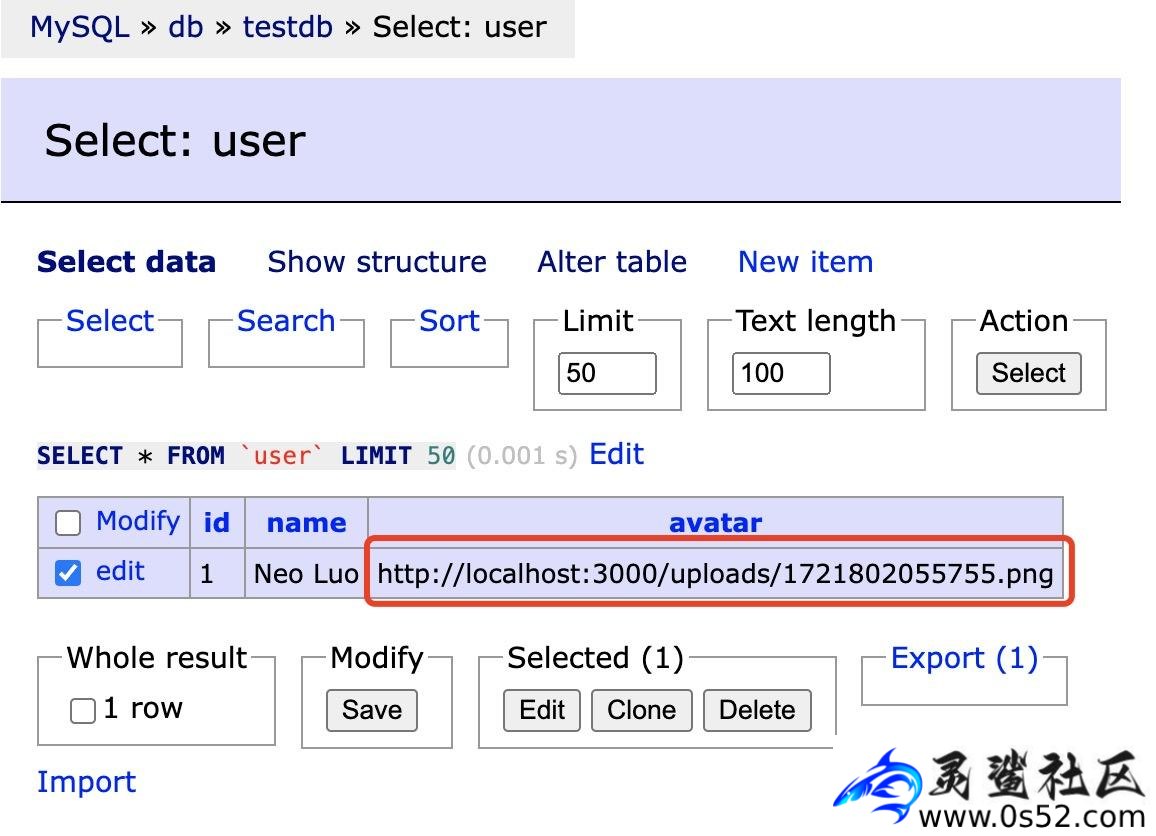
在Adminer中查看头像绑定到user 数据中
4. 资源映射
主角登场: 当上传的是为文档资源时候,这时候我们经常需要保存上传的文档原有名称,就需要通过资源映射表:resource-mapping ,记录下上传的文件名称,url和绑定user
4.1 创建 ResourceMapping 实体类
ResourceMapping 和 User关系为多对一关系
ts
// src/upload/resource-mapping.entity.ts

import { Entity, Column, PrimaryGeneratedColumn, ManyToOne } from 'typeorm';
import { User } from '../user/user.entity';

@Entity()
export class ResourceMapping {
  @PrimaryGeneratedColumn()
  id: number;

  @Column()
  name: string;

  @Column()
  url: string;
}
4.2 上传资源信息保存
上传的资源名称,url需要保存到resource-mapping表中,这里需要创建:UploadService来做创建数据的处理
shell
nest g s upload --no-spec
ts
// src/upload/upload.service.ts

import { Injectable } from '@nestjs/common';
import { InjectRepository } from '@nestjs/typeorm';
import { Repository } from 'typeorm';
import { ResourceMapping } from './resource-mapping.entity';
import { ResourceMappingDto } from './upload.dto';

@Injectable()
export class UploadService {
  constructor(
    @InjectRepository(ResourceMapping)
    private readonly resourceMappingRepository: Repository<ResourceMapping>,
  ) {}

  async create(dto: ResourceMappingDto) {
    const createRecord = await this.resourceMappingRepository.save(dto);
    return createRecord;
  }
}
create方法为创建资源记录,其中 ResourceMappingDto 为:
ts
// src/upload/upload.dto.ts

export class ResourceMappingDto {
  name: string;
  url: string;
}
在upload.controller 中创建上传附件资源的api:uploadAttachment
diff
// src/upload/upload.controller.ts
+ import { UploadService } from './upload.service';

@Controller('upload')
export class UploadController {

+    constructor(
+        private uploadService: UploadService,
+    ) {
     ...
+    @Post('/uploadAttachment')
+    @UseInterceptors(FileInterceptor('file'))
+    async uploadAttachment(@UploadedFile() file) {
+         const { originalname = "", filename } = file
+         const url = `http://localhost:3000/uploads/${filename}`
+         return this.uploadService.create({ name: originalname, url })
+   }

    }
其中originalname为附件资源上传名称。还需要再 UploadModule中引入ResourceMapping
diff
....
+ import { ResourceMapping } from './resource-mapping.entity';

@Module({
  imports: [
+    TypeOrmModule.forFeature([ResourceMapping])
   ...
现在通过POST localhost:3000/upload/uploadAttachment 上传附件
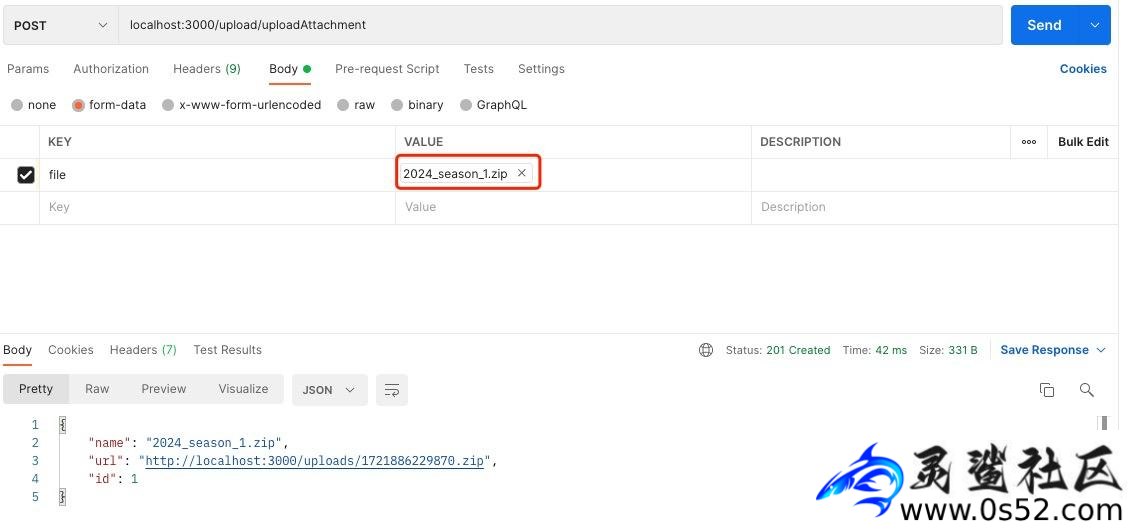
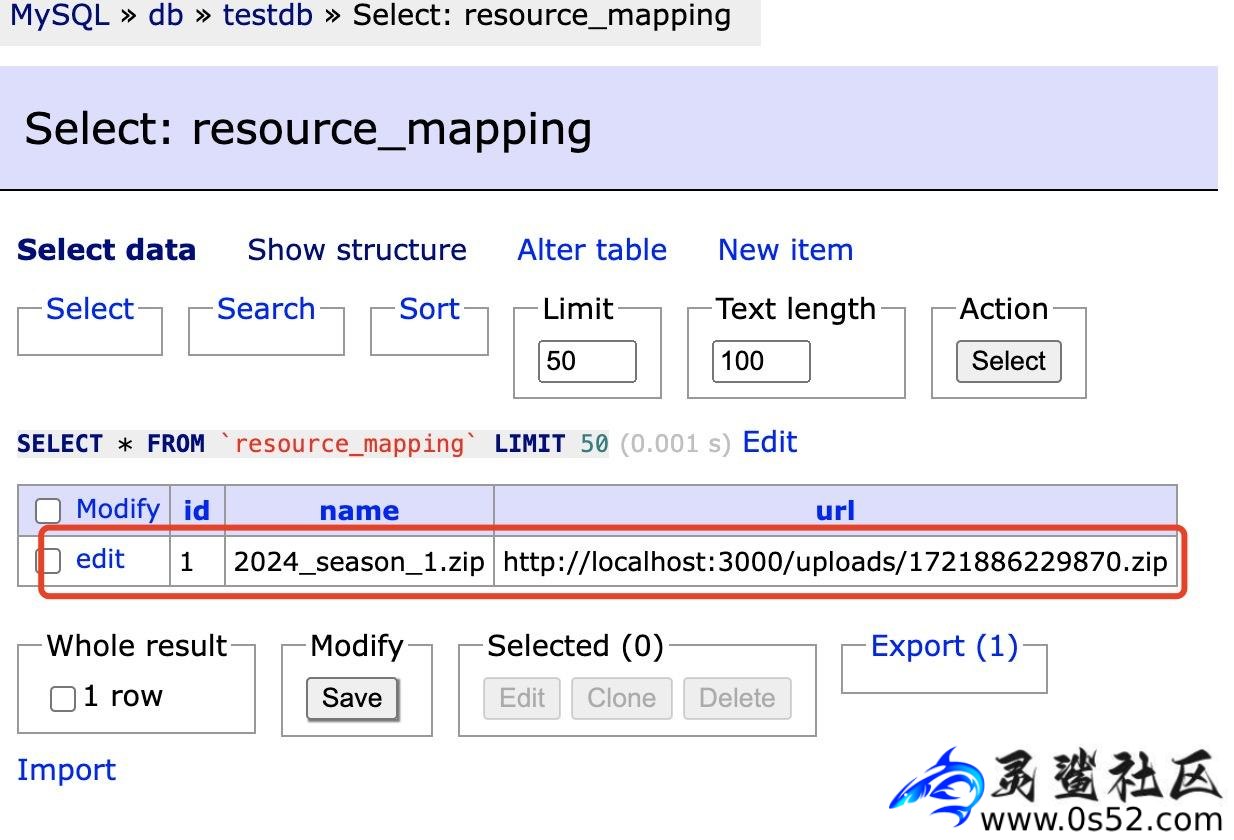
可以看到response 的name 为资源上传时候的名称:2024_season_1.zip保持一致, 通过Adminer查看落表结果:
4.3 user绑定资源映射
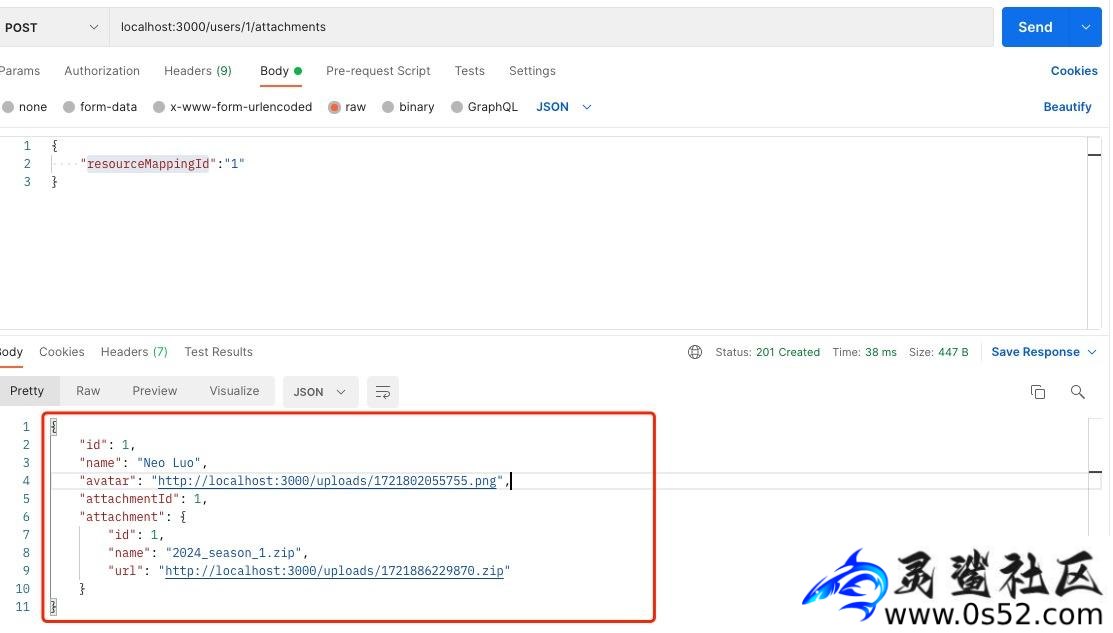
user表与 resource-mapping表关联关系的设计思路:日常开发中resource-mapping 资源映射不单单只有user附件资源映射,还会有其他表的资源映射,所以在resource-mapping不能留有关联user附件字段,只能在user中添加attachmentId字段去关联resource-mapping,修改user.entity
diff
// src/user/user.entity.ts
import {
    Entity,
    Column,
    PrimaryGeneratedColumn,
+    ManyToOne,
+    JoinColumn
} from 'typeorm';
...
+    @Column()
+    attachmentId: number;

+    @ManyToOne(() => ResourceMapping, { eager: false })
+    @JoinColumn({ name: 'attachmentId' })
+    attachment: ResourceMapping;
UserService中添加绑定附件方法:addAttachment
diff
// src/user/user.service.ts
+ import { ResourceMapping } from '../upload/resource-mapping.entity';

@Injectable()
export class UserService {
    constructor(
        @InjectRepository(User)
        private usersRepository: Repository<User>,
        @InjectRepository(ResourceMapping)
+        private readonly resourceMappingRepository: Repository<ResourceMapping>,
    ) { }

+      async addAttachment(userId: number, resourceMappingId: number) {
+        const userProfile = await this.usersRepository.findOne({
+            where: { id: userId },
+        });
+        const resourceMapping = await this.resourceMappingRepository.findOne({
+           where: { id: resourceMappingId },
+        });

+        if (userProfile && resourceMapping) {
+            userProfile.attachment = resourceMapping;
+            userProfile.attachmentId = resourceMappingId;
+            await this.usersRepository.save(userProfile);
+       }
+        return userProfile;
+    }
其中最主要是attachment,attachmentId绑定resourceMapping映射资源。接下来创建对应api接口:UserController
diff
// src/user/user.controller.ts
import {
   Controller,
   Post,
   Body,
+   Param,
+   Get } from '@nestjs/common';

+@Post(':id/attachments')
+    async addAttachment(
+        @Param('id') userId: number,
+        @Body('resourceMappingId') resourceMappingId: number,
+    ) {
+        return await this.userService.addAttachment(userId, resourceMappingId);
+    }
通过url获取userId(3.2步骤中创建用户返回的id),body方式获取resourceMappingId(4.2 步骤中上传附件返回的id),user.module中还需要引入resource-mapping实体类
diff
// src/user/user.module.ts
+ import { ResourceMapping } from '../upload/resource-mapping.entity';

@Module({
  imports: [TypeOrmModule.forFeature([
    User,
+   ResourceMapping
  ])],
请求接口:POST localhost:3000/users/1/attachments 用户绑定附件
4.4 user信息查询
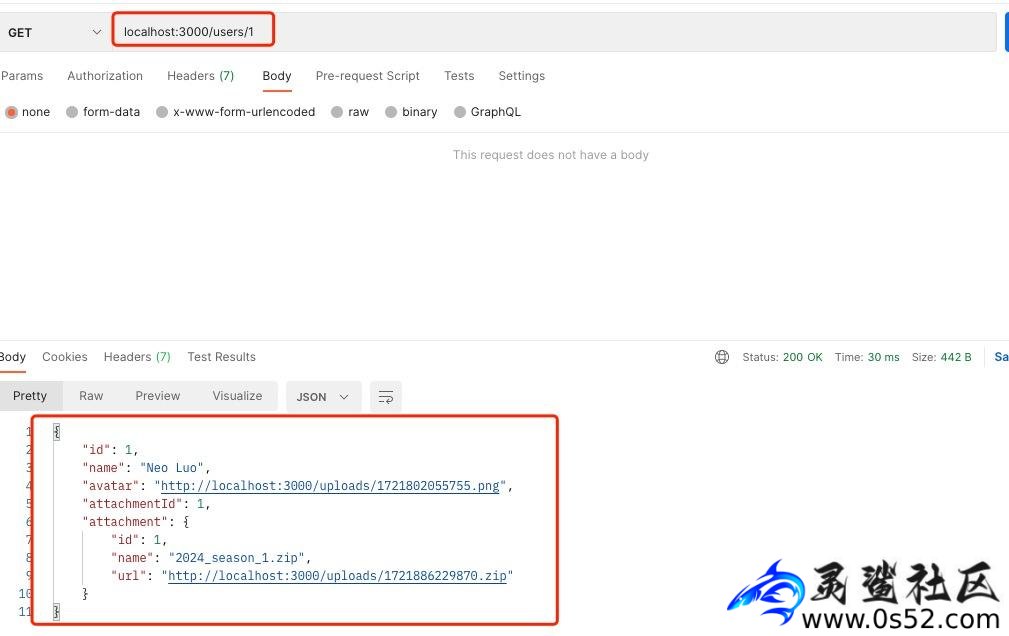
用户与附件资源绑定成功后,如何查询出用户信息以及绑定的资源信息也是关键,这里添加获取用户信息方法:getUserInfo
diff
// src/user/user.service.ts

+ async getUserInfo(id: number) {
+        const userProfile = await this.usersRepository.findOne({
+           where: { id },
+           relations: ['attachment'],
+        });
+       return userProfile;
+   }
添加对应api方法:getUserInfo
diff
// src/user/user.controller.ts

+  @Get(':id')
+   async getUserInfo(@Param('id') id: number) {
+       return await this.userService.getUserInfo(id);
+   }
成功获取用户信息以及绑定的附件信息
总结
本文介绍了在 NestJS 框架下使用资源映射策略来管理上传的资源。以下是关键点总结:
- 资源映射的优缺点:
- 优点:
- 灵活性高
- 资源路径更安全
- 维护方便
- 缺点:
- 查询时需额外关联资源表
- 增加了复杂性
- 优点:
- 实现步骤:
- 创建并配置 NestJS 项目,设置资源上传及存储。
- 实现上传头像和附件的接口,分别处理用户头像和附件资源的上传。
- 使用 TypeORM 进行数据库操作,将附件信息保存到资源映射表中,并将附件ID绑定到用户表。
- 通过 API 接口实现用户数据和资源的关联,查询用户信息时可获取到相关资源信息。
- 时序图:
- 用户头像更新:
- 上传头像 -> 返回 URL -> 提交用户数据 -> 更新数据库 -> 成功通知
- 用户附件处理:
- 上传附件 -> 保存附件信息到数据库 -> 返回资源映射信息 -> 提交用户数据 -> 更新数据库 -> 成功通知
- 用户头像更新:
- 资源映射表设计方式:通常情况下资源映射表更多是全局性质目的单一的表只做资源存储映射,不应该有任何业务表的关联字段,而是由业务表关联资源映射表,比如User 中的 attachment,attachmentId来绑定资源映射表,
本文通过实际案例展示了如何使用 NestJS 实现资源映射,并提供了详细的实现步骤和代码示例。


评论